The Link Image widget allows you to show different images on the web page depending on cell values or formulas. This tutorial uses the Link Image widget to show the flag for a new member’s home country.
In the below membership application form, the new member selects a home country using a Dynamic Dropdown widget. A link to the new member’s country flag is saved with the form. Thanks to the Link Image widget, the right flag is also shown at the bottom of the form.
Try it for yourself! Select your home country in the form and watch the flag change.
If you enter all the required data in the form, you can press the Submit button and see what a form like this looks like when someone submits it to you.
Disclaimer: Working with country data is complicated. Some countries may be more disputed than others. Some countries may have a different official name than you think. Our source for country codes and official country names in English is Wikipedia. Our source for country flags is Flagpedia. For countries without a flag in Flagpedia, we show the flag for the United Nations. Over time, the source may divert from the copy used here. We regret if any part of this tutorial offends you, including the list of countries and their flags.
If you have installed SpreadsheetConverter in your laptop, you may want to open the source spreadsheet for the form above in your own Excel now, to see what the spreadsheet source for the form above looks like in Excel. Note: you must install the SpreadsheetConverter add-in to use the spreadsheet, or none of this will be visible.
Download the spreadsheet with the membership application form.
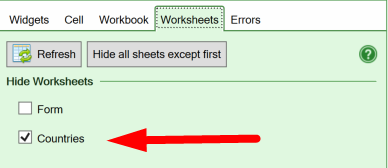
Many widgets require background data that you don’t want to make visible on the web page. In most situations, it is very convenient to have one or more background data sheets to keep this data in. In our case, we created an extra worksheet called Countries. Using the Worksheets tab of the task pane, we can easily mark this worksheet as hidden in the converted web page.
We copied all alphabetic and numeric ISO country codes from Wikipedia to column A-C of the Countries worksheet. The country names from Wikipedia are in column D and the country names from Flagpedia in column E.
The link to each flag image in column F is calculated with this formula:
=IF(TRIM(E2)="";"http://www.un.org/sites/www.un.org/themes/bootstrap_un/logo.png";"http://flags.fmcdn.net/data/flags/h40/"&LOWER(A2)&".png")
What the formula does:
Switch to the Countries tab of the example spreadsheet to see the formula at work in the table.

The electronic forms that you create with SpreadsheetConverter don’t have to be plain. You can use all the formatting options in Excel like column width, background color and character size. Excel doesn’t know much about web page design, so we added a simple Theme Designer to give you full control over the formatting of the web page.
Below is a further developed version of the same membership application form. We just changed the background color to brown, and the foreground color to white.

Switch to the Form tab in the example spreadsheet to see the simple form we created. Most of the text fields are defined the same way:
As you can see from the screenshot above,
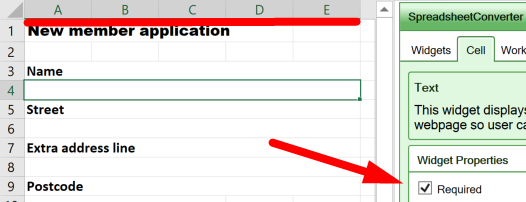
We also added a placeholder text, an in-field prompt describing what input we expect, like Enter your full name for the Name field. Using the Name property of the widget, we assigned a name to each input field. When the form is submitted, this causes the field to be referred to as more explanatory member_name and not just something like “A4”. This makes things much easier in the post-processing of received forms.
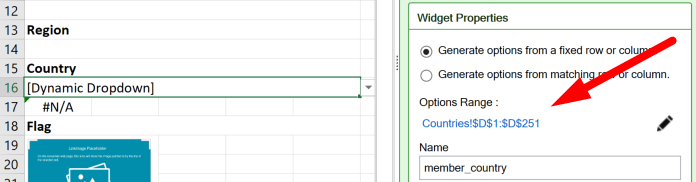
For the Country selector, we used a Dynamic Dropdown widget. It displays the list of country names from Wikipedia. Using a predefined list ensures that the field always contains valid country names, removing the risk of spelling errors. Notice how the Options Range setting for this widget designates the appropriate cell range from the hidden worksheet. Like for all other fields in the form, we gave the input field an explanatory name.
OK, now we have the list of country names in the dropdown, and all the flag links on the background worksheet. Now we need to find the right image link, and provide it to the Link Image widget.
To look up the country, we inserted the following formula in A17:
=VLOOKUP(A16;Countries!$D$1:$F$251;3;FALSE)
What the formula does:
If you only want to pick the right link for a Link Image widget, you can place the lookup cell on the background sheet. But we want the link to the flag to be saved with the form data when the form is submitted, so we put the VLOOKUP in a cell on the Form tab.
It’s nice with a colorful flag in the form, but how do we hide the ugly link?
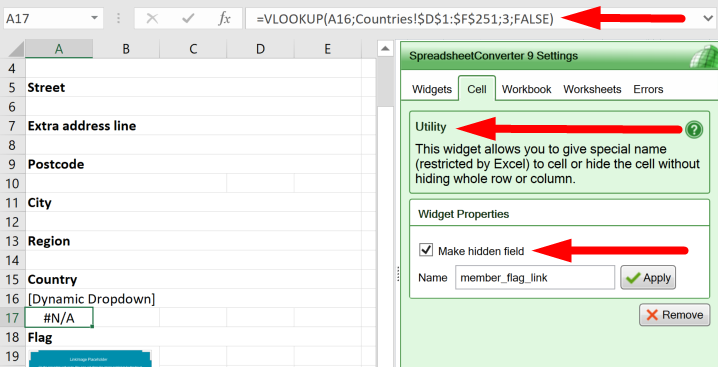
Select cell A17 the spreadsheet. You can see the VLOOKUP formula in the cell. But in the task pane you can see that we have also inserted a Utility widget in the cell. This gives us access to the Make hidden field property, which will hide the link in the web page but still submit it with the form. And again, if you assign names to all input fields, you will save a lot of effort in post-processing.
As you can see in the example spreadsheet, we merged cells A19:B23 to create a small container for the linked image. This is where we’ll now insert the Link Image widget.
Image widgets like Link Image, Google Map or barcode are represented in Excel using an empty placeholder. The placeholder cannot show the correct image in Excel, but it allows you to position the image correctly within the form and give it the correct size. When you convert the spreadsheet to a web page, the widget replaces the placeholder with the actual image it is supposed to show, e.g. the map or barcode.
Before you insert any kind of image widget we always recommend that you merge the cells behind the image placeholder. In most cases it works fine anyway but merging the cells makes it much more obvious to both you and SpreadsheetContainer where the image is supposed to go.
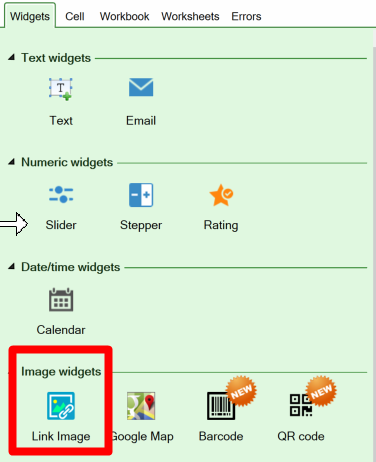
To insert a Link Image widget, select the cell where you want the upper left-hand corner of the placeholder to appear. Make the task pane visible. Locate the Widgets tab and click on the Link Image widget icon to insert the placeholder into the selected cell.
When you insert the Link Image widget into a cell, you also need to tell it in what cell it can find a link to the image it is expected to show. Set the Image Reference to the cell that contains this link. In this example, the link is returned by a VLOOKUP formula in cell A17.
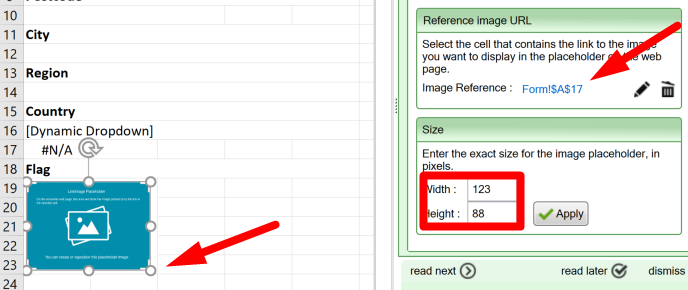
You can drag the placeholder to the best position, and change the size of the image as it appears in the web page by dragging the placeholder’s handles. In our case, we made the placeholder the same size as the merged cell area behind it. To adjust the width and height to an exact size in pixels, enter your numbers in the corresponding widget settings and click Apply.
Note: the Link Image widget never distorts the images. If you have a lot of images in various sizes, you can still specify a maximum width and height here. Each image will be resized proportionally to fit entirely within the placeholder.
OK, we seem to be set. Save the spreadsheet if you’ve made any changes to it. Perhaps this is a good time to rest a little.
Click Convert in the SpreadsheetConverter ribbon to convert the spreadsheet to a web page. The converted web page usually opens automatically in one or more of your web browsers. Otherwise, make the History list visible in the task pane and open the converted web page from there.
In the web page, select a different country and watch the image change to show the right flag.
SpreadsheetConverter comes with built-in one-click web publishing. Your form is hosted on the distributed Amazon S3 infrastructure with superior performance, extreme reliability and massive scalability. Over a dozen server locations around the globe ensure that your calculator always is within easy reach of your global audience.
Our Publish to Cloud feature automatically generates all the HTML you need to add the calculator to your website.
The iframe we used when we included the form at the beginning of this web page (scroll up!) looks like this:
<iframe src="https://ssccust1.spreadsheethosting.com/1/59/226a21cef25ec5/Address-with-flag-dyndrop/Address-with-flag-dyndrop.htm" width="560" height="740" frameborder="0">
To include the form, we just pasted the above HTML into the HTML source of this web page. To learn more, read the help page for Publish to Cloud or one of the tutorials in the list below.
Converting spreadsheets to web format makes it very easy to import them into your blog or website. Here are tutorials on how to do this in various popular environments: