
Add and edit widgets 
Use widgets in your spreadsheet to improve the functionality and appearance of the converted web page. Text fields, dropdown lists and calendars help end users enter information; other widgets display or act on the values in your workbook.
Add a widget to a cell 
- Select the cell where you want the widget in Excel.
- Open the Widgets tab in the SpreadsheetConverter task pane.
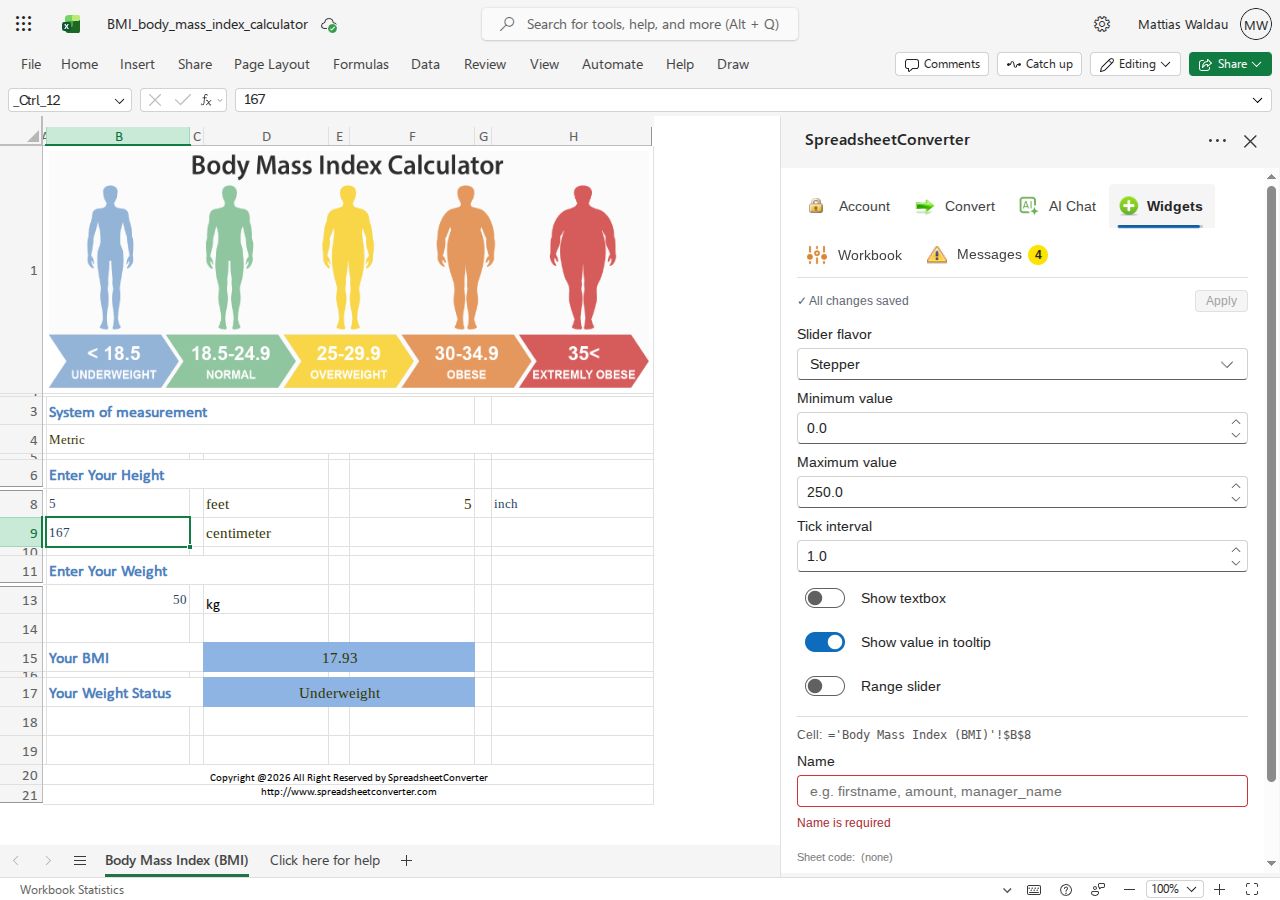
- Choose the widget type and fill in its settings.
- Use Apply to save the changes, then convert and test the page.
The Widgets pane follows your selection in Excel. Selecting an existing widget cell opens that widget’s settings. Selecting a cell without a widget opens the picker. Keep the widget on the cell where it belongs rather than looking for a separate web-page editing step.
Choose cells and ranges 
Some widget settings refer to another cell or a range. Follow the picker’s prompt to click a cell on the sheet, or select a range and choose Use this range. Use Cancel if you do not want to replace the reference.
Save and check changes 
The pane saves valid widget changes as you work. Apply gives you an explicit way to save before conversion. If a setting is invalid, fix it before leaving the widget: the pane retains the unfinished draft so you can return to the widget’s cell.
If the pane says that stored widget settings could not be read, it preserves the widget. Do not replace it merely to dismiss the message; use the available details when asking for help.
Delete a widget 
Select the widget’s cell, choose Delete widget, then click again to confirm. This removes the widget, rather than changing the cell into another widget type.
Test the published control 
Convert after changing the widget and try it in the preview. Check both the values it writes and any formulas that depend on them. Widget behavior can depend on the selected output flavor and hosting: a control visible in the add-in does not guarantee identical behavior in every destination.
Choose a control that fits the field 
Use a Textbox for typed values, a Dropdown or Radiobutton group for a defined choice, a Checkbox for a yes/no value, a Slider for a bounded numeric value, or a Calendar for a date. Set the widget’s permitted values and test both its initial value and a changed value in the preview.
Dependent dropdown choices 
The Dynamic Dropdown widget connects a field’s choices to other values in the workbook. Configure its references in the pane and test the sequence of selections in the converted page. When the first choice changes, check that the later field contains a valid choice and that the formulas use the expected value.
Images and maps 
A dynamic image widget selects an image from the configured values or references. Use image addresses that end users can reach. For a Map widget, configure the location references and, where required, the Google API Key in Workbook → Advanced settings. Check the actual published host: the HTML and Node.js map providers and a Server-hosted form can have different capabilities.
The add-in key field is not a guide to the current Google account console. Follow the map provider’s current account and key restrictions when setting up a new key; do not apply the older console screenshots blindly.
Barcodes and QR codes 
Barcode and QR-code widgets display a scannable value on the page. Configure the value or reference, convert, and scan the result. Test a changed value as well as the initial value, and check the scanned content rather than judging only the image’s appearance.
Show and hide parts of the page 
The Show/Hide widget uses a workbook condition to control the configured rows, columns or sheets. Test both sides of the condition. A hidden area is a presentation choice, not a way to keep confidential workbook data secure.
File attachments 
The File Upload widget lets a form include files when its output flavor and hosting support the upload protocol. HTML and Node.js use an upload staging service; Server forms use the Server record protocol. A widget with no available upload capability is disabled rather than a working upload promise.
Test a permitted file at the real publishing destination and verify the resulting submission or saved record. Do not assume that seeing the file picker proves the upload service and destination are configured.