In this tutorial, we will create an online survey form with Excel and convert it to a web page. We will collect the survey responses in a database for later analysis. And we will do all this without any programming whatsoever!
In the previous tutorial, Create your first online form with Excel, you saw how simple it is to create an electronic form in Excel and publish it on the web with our famous Excel-to-html web authoring product SpreadsheetConverter. Submitted forms can be received in any e-mail Inbox thanks to the included Free Submit Service.
In this tutorial we’ll create a more complex survey form for course evaluation and save the responses in a database. This is a feature of the fee-based Advanced Submit Service. In a later tutorial, we will then download the survey responses into Excel and analyze them there.
### Länka till denna tutorial från Help > Input cells när den är upplagd
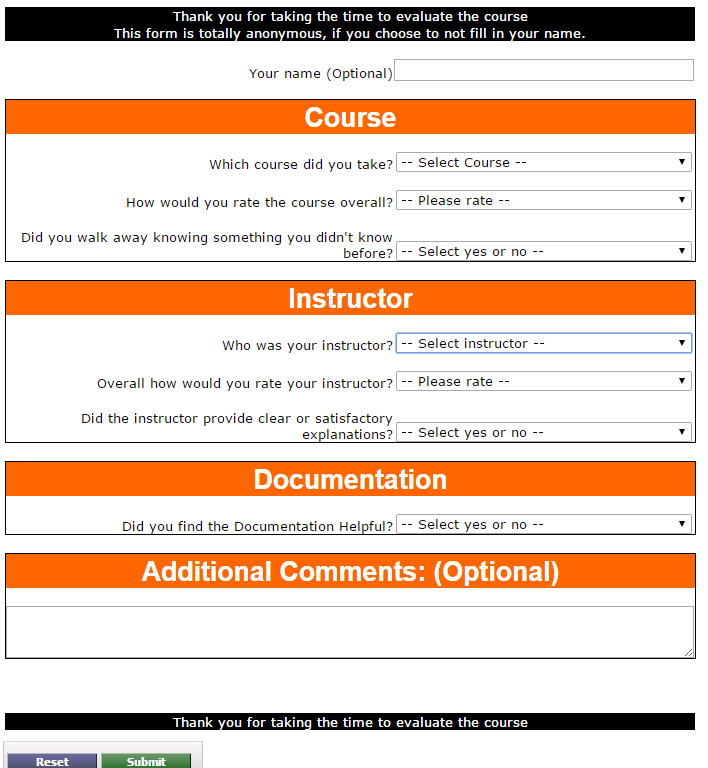
The survey web page
Here is the finished electronic web form that we’ll create for our survey.
## Byt ut bild och länk nedan
The Survey Form
To start getting survey responses, we need to do the following:
We will now create the complete survey form in Excel. Excel’s row/column format helps give the form a structure. In this case, the survey spreadsheet has two columns, one for the questions and one for the user’s responses.
When designing forms in Excel, you may be tempted to use formulas, charts and =if structures to achieve what you want. Just go ahead and do it! SpreadsheetConverter will port the entire form to the web format of your choice, including some of the most advanced features of Excel.
## Byt ut bild och länk nedan, kanske bara ha en version av arket.
Feel free to create your own survey form from scratch, or download the initial, raw spreadsheet without the formatting.
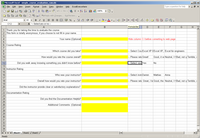
The raw spreadsheet before we added formatting
Enter the headings and the questions that make up the survey form as text into the spreadsheet.
Use a new spreadsheet cell for each separate heading or question.
### Bild här
When converting a spreadsheet to a web page, SpreadsheetConverter must determine what cells to open for data entry. All other cells are locked in order to protect formulas, captions and constants, and to give the spreadsheet the overall appearance of a web page.
In the previous tutorial, Create your first online form with Excel, we used the Text field widget for the input fields in the form. In this tutorial, we will show you another method that uses a reserved background color to mark the input cells. In this case we will give each input cell a bright yellow background color. Just select the nine cells that are to contain survey responses and give them a bright yellow background color.
### Bild här
We need to decide how we handle each response from a user interface point of view. SpreadsheetConverter provides several different user interface tools or widgets that you may use depending on the type of answer that is appropriate for each question.
(Some widgets may not be available in all flavors of the product.)
In this tutorial we will use text fields for the student’s name and the free comments field, a drop-down list for most of the grading questions, radio buttons for one question and a check box for another. Instructions for adding each of these input cells with widgets can be found below. If you prefer, you may also use native Excel mechanisms like Data > Data Validation to create some of these user interface enhancements.
When the student has entered values into the survey form and submits it for processing, the responses will be saved in a database and also sent by e-mail. To make it easier to interpret the responses, you should always assign a field name to each spreadsheet cell that is used for user input. These cell names will be used as field names in the database and in the e-mail.
Named cells can also receive input from the link to the form. As an example, if the link to the form contains a language code (/form.htm?lang=sv), it will be preserved by the form if your form has a text field named lang, and forwarded with the form when the form is submitted for processing. If you want to provide information to a form processing script without showing it in the form you have the option of using hidden fields.
In the previous tutorial, Create your first online form with Excel, we named cells using Excel’s built-in cell naming mechanism. This time we will show you the alternate method of using named widgets in SpreadsheetConverter.
We will use two text boxes in this survey. The first one is simple, just select the cell that is to contain the student’s name, insert a Text box widget and name it student_name (remember to always press Apply for this field).
The second text box is slightly more complicated. We want a larger text field at the end of the survey, for comments. To create a large text box, you can always change the size of a cell by increasing its row height or column width. However, this will affect all other cells in the same row and/or column, making the layout of the form unnecessarily complicated.
A better way to create a large text box is often to merge two or more adjacent cells into one. In column B, click in the uppermost cell in the range you want to merge and then hold the mouse button down while you drag the mouse down to select all the cells that you want to merge. Right-click on the selected cells, then navigate in the menus to Format cells > Alignment and check the Merge cells option. Press OK and the cells will merge into one.
Now that you have created a larger cell to hold the comments field, select it and insert a Text box widget into it. Check the Multiline option. Give the widget the name comments.
### Bild här
The survey contains five questions for which we will use drop-down lists. The course_name and instructor_name fields are simple multi-choice answers where we just made up a few course and instructor names. For the course_rating, instructor_rating and documentation_rating fields we certainly would consider using a Rating widget instead, but since they currently aren’t available in all flavors of the product it is easier to use drop-down lists to allow the user to select grades between 1 and 4.
To create the lists, select each cell and insert a Dropdown list widget. All these answers are Required so please select that option. When Required is set, you also need to provide a default text, a dummy choice at the top of the list that implies that no “real” option has been selected yet – typically it’s is also used as a prompt. We usually repeat the question in the default text:
— Rate the course, 4 is the best.
Then add all the possible correct answers to the question as List labels, i.e. the course and instructor names for their respective questions, and the valid grades, e.g. the numbers 1 through 4.
Name each widget and press Apply.
### Bild här
For the inevitable “would you recommend this course to others” question we decided to use radio buttons. The good thing about radio buttons is that you see all the available choices. The bad thing is that this may consume a lot of screen space. But we do have room for Yes, Perhaps, and No.
Select the appropriate cell and insert a Radio button widget. Make it Required and give it the choices Yes, Perhaps and No. Select a horizontal layout and name the widget course_recommend.
### Bild här
We try to avoid check boxes because there are so many questions where there are more possible options than you would initially think of, like “I don’t know” or “It depends”. Use check boxes only for questions that must be answered with yes or no, there is no room for doubt, like “Are you a British citizen?”.
In this survey, we will demonstrate the use of a check box for the question “Have you had this instructor before?”.
Select the appropriate cell and insert a Check box widget. Give it the name instructor_before.
### Bild här
Now that we have created the survey spreadsheet the next step is to use SpreadsheetConverter to convert it to a web page. In the previous tutorial, Create your first online form with Excel, we covered the basics of this process:
Return to the previous tutorial if you want to study these steps in more detail.
Before we convert the survey form to a web page, there are a few additional things to consider:
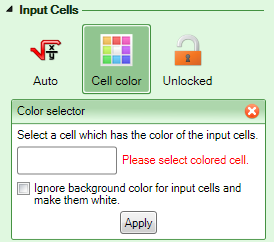
We need to tell SpreadsheetConverter what background color we used for the input fields. All cells with the selected background color will be opened for input in the converted web page. We define this color on the Workbook tab under Input cells. Select Cell color as the method of designating input cells, then select one of the input cells in the survey form that you have already given this background color. If you wish to retain the bright yellow background color also in the web form you can then just press Apply. If you used the color just as a convenient means to open the fields for input, you can now check the option to ignore the background color for input cells which will give them a white background.
Before the first form is submitted, we need to have a subscription for the Advanced submit service and enter the corresponding e-mail address in the form.
### Bild här
To convert the spreadsheet to web format, we do the following:
If you want to examine these steps in detail, please return to the previous tutorial, Create your first online form with Excel.
### Bild här
The survey form must be published on the web before you can invite people to use it. SpreadsheetConverter comes with easy-to-use Dropbox sharing for any converted web page. To publish the survey form on the web with Dropbox, we do the following:
If you would like to review these steps in further detail, please study the tutorial on how to share a live calculator or smart web form with Dropbox.
### Bild här
At last! We’re now ready to open the survey form in a web browser using the public Dropbox link. We will answer the questions and submit the first survey response. We will then check the e-mail inbox for the e-mailed copy of the completed survey form. As a final step, we wlil login to the Advanced service and check that a database table has been crated for our survey, and that our new response has been stored in it.
Open a web browser and paste the link to the survey that you got from Dropbox into the address field. The survey form should open, and look just like it did when you previewed it directly after conversion.
### Bild här
Go through the questions in the survey and answer them one by one. Verify that the drop-down lists work as they should, and contain all the choices. Test the radio buttons and the check box. Enter some text in the Comments field.
Press the Submit button to start the automatic processing of the form. Technically, the form is now sent to servers hosted by us. They will send the completed survey to you twice, as an e-mail to the designated inbox and as a new entry in a database.
### Bild här
Check the inbox you set for the survey for the first e-mail from the survey. The layout of the e-mail should be almost identical to the survey form, a distinct advantage you get from using the fee-based Advanced submit service instead of the free service.
### Bild här
Using the user name and password provided to you when you subscribed to the Advanced submit service, login to the service and check your table of responses there. You should find your first response in the table, ready to be downloaded for analysis whenever you like.
### Bild här
In this tutorial we created an electronic survey form with Excel, then converted it for the web with SpreadsheetConverter. We published the form on the web and saw survey responses not only being received as nicely formatted e-mails, but also securely stored in a hosted database – all without any programming.
It is incredibly easy to use SpreadsheetConverter with its built-in forms handling to create and process online forms. In other applications, you will probably want to use Excel to calculate things like row or column totals, or averages. Almost the entire library of Excel functions is at your disposal, and of course you’ll want to use charts to visualize the results. The conditional processing features of Excel will help you dynamically adapt a form or calculator to changing requirements. The steps involved to create such an advanced electronic form are exactly the same as in this example, it’s just a bit more work in Excel.
Using the same technique, you can create numerous electronic forms to support your own business:
Good luck! Do not hesitate to invoke our Help Desk if you have any problems.
## Byt ut länkarna nedan
The formatted spreadsheet: simple_course_evaluation.xls (18 KB)
The spreadsheet without formatting: simple_course_evaluation_raw.xls (20 KB)


Click on Download to install and test this Excel add-in for Windows.
Click on Upload to let us convert a spreadsheet for you for free.